Making maps with Mobile Atlas Creator
Currently the best and easiest way to make maps for Maplorer is the interactive application Mobile Atlas Creator. Version 1.8 alpha 14 now allows to automatically create Maplorer maps for any location. You can download it here. Just download the zip, extract it to a folder and start Mobile Atlas Creator.exe Detailed instructions are below (click on images to enlarge):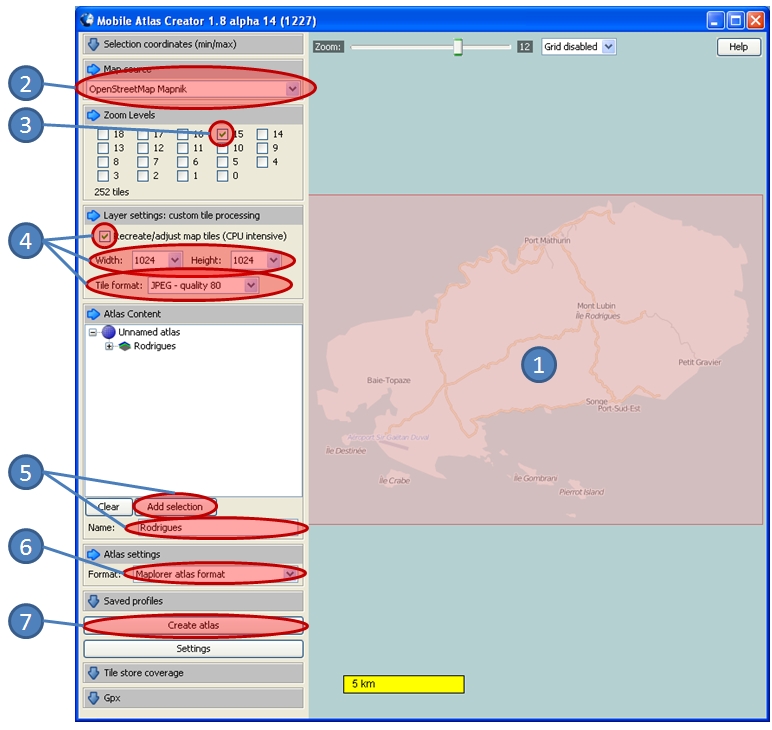
- Select the region for which you want to create maps by dragging a rectangle (to find your region, you can use right-click to drag/pan, mouse wheel or the slider on top to zoom).
- Choose any map source; OpenStreetMap Mapnik is a good choice for hiking/biking, but any other will do.
- Select a zoom level. The bigger the level, the more detail you get. 15 is a good compromise for hiking/biking.
- Under Layer Settings, activate Recreate/adjust map tiles and choose a JPG Tile format. A good resolution for Maplorer is 1024x1024.
- Give your map collection a name and press the Add selection button.
- Under Atlas settings, choose Maplorer atlas format.
- Push the Create atlas button.
Once all tiles have been processed, you can use the Open Atlas Folder button to see the result; open the subdirectory and copy all .pos and .jpg files to your device, in the Maplorer folder (the one where you stored maplorer.exe).
Just start Maplorer on your device to automatically create the master map, and off you go!
Capturing maps from any source in 5 easy steps
If for some reason you can not / do not want to use Mobile Atlas Creator to make maps, you can use the manual method described below. The explanation below uses maps from openstreemap.org, because it is open source (you can use the maps for free as you wish), but the concept works for any map you are able to display on your computer screen.
- Goto http://www.openstreetmap.org/ and display the map you want in your web browser.
- Click the 'Export' tab
- Choose one of the 'Image...' options under 'Format'
- Choose 'JPG' under Options/Format
- Click 'Export' to create the map_A1.jpg file
Commercial providers such as geoportail.fr, maps.google.com, Google Earth can also be used; non commercial, personal use of the maps is mostly allowed by these sites (check the current version of legal instructions on the respective site). If there is no 'Export' function, you can simply use a screen copy:
- Display the map in your Web Browser.
- Press Alt-PrintScreen to copy the browser window to the clipboard
- Start your favourite bitmap editor (e.g. Paint) and paste (Ctrl-V)
- Crop the image so that only the map is visible (e.g. in Paint, select the map and choose Image/Crop)
- “Save as” map_A1.jpg , and copy it to the same directory as maplorer.exe on your device
In order to be able to display the current position on your new map, you need to tell MAPLORER where exactly the map is located – you need to specify the Latitude and Longitude for both the top-right and bottom-left corners of your image. All services which offer maps also allow showing these coordinates:
- On http://www.openstreetmap.org/ the data is directly displayed under the 'Export' tab
- In Google Earth and most other sites/tools, just move the mouse to the corner and note the values displayed in the status line.
- NEW ! With Google maps you can use my handy Google Map Grabber.
These coordinates have to be written into a text file called map_A1.pos, like this:
LonBL = 6.965277778
LatBL = 43.66805556
LonTR = 6d59'29
LatTR = 43.68166667
NEW ! You can use this tool to create the POS file.
Note that you can specify coordinates in decimal notation (“6.965277778”) or degrees-minutes-seconds notation (“6d59'29”), whatever you prefer. The letter ‘d’ is used instead of the character ‘°’ to assure compatibility with all handheld devices.
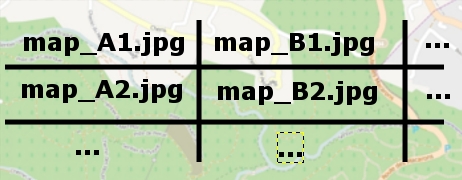
You can repeat this process and create up to 26x9 maps like this (although I recommend to use 3x3 or less). They should be named according to the following scheme:
Next  Using maplorer